Wednesday, March 15, 2023

SwifDoo PDF Review – All that you need to know about this magical PDF editing tool


Are you someone who has to often deal with PDF files? If answered yes, you will require tools to edit them whenever required. Thanks to the lightweight and mobility of laptops, they are getting increasingly popular. Therefore, this makes it even more necessary to learn how to edit PDF files in laptops that are compatible with various Operating Systems.

However, as long as editing PDF files in laptops are concerned, it is vital to select the right PDF editor supported by your operating system. In case you’re wondering about the ways in which you can edit a PDF document on your laptop, we will give you the details on this magical software SwifDoo PDF editor.


What makes PDF so popular?

What are the two most noteworthy reasons behind the gaining momentum of PDFs? Well, their popularity can be related to their integrity and stability. At the same time, these are the two factors that can lead to obstructions for PDF users. Since PDFs are much different from other file formats like Microsoft Office documents, it is nearly impossible to edit or make any changes to a PDF document without appropriate support from professional PDF editing tools. Majority of the PDFs are image-only documents rather than digitally-created PDFs.

Regardless of which category or kind of PDF you have, the good news is that, apart from Adobe acrobat and Microsoft Office, there are several other solutions targeted at editing a PDF. SwifDoo is one such excellent free PDF editor.

What are the reasons to need an All-in-One PDF editor?

There are numerous scenarios where you’ll find yourself in dire need of a tool that edits PDF files. Accountants or teachers may need colleagues or students to fill out forms as a part of their educational process. Since these PDFs are not edited easily and hence it is extremely important to have a PDF editing tool.

You may need to apply watermarks, insert images, add e-signatures to a PDF. SwifDoo PDF is one such PDF editing tool that helps you in editing all your PDFs. With the advancement in technology, we’re progressing towards a paperless office and here comes in the importance of being able to edit PDFs. PDFs play a crucial role in going paperless. This is why you will need a comprehensive free PDF editor.

Steps to edit PDF files through SwifDoo PDF

Windows is probably the most common operating system in laptops but there are still many Windows 10 systems that don’t have an in-built PDF editor. Let us introduce to you a useful PDF editor software for free download.

SwifDoo PDF is certainly your top pick when it comes to editing PDF files. This tool offers a 15-day trial after a free download. It has been designed with performance and simplicity in mind. This PDF editing feature lets you edit the size of font in fillable PDF forms, copy text from the file, and embed videos in a PDF. Let’s check out a few steps to edit PDF files on laptops in SwifDoo.

Step #1: Download SwifDoo and install it

Just as any other software, with SwifDoo too, you have to download the software from a trusted download site and install the software on your computer by following the steps mentioned. After downloading it, double-click on it to run it on your PC.


Step #2: Open the PDF file

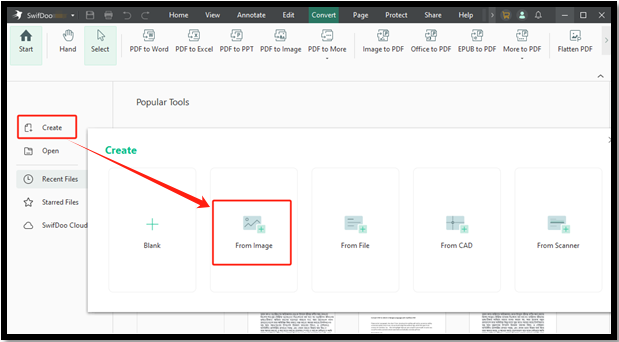
After you install the software, you will find an ‘Edit PDF’ button on the home window through which you can import the PDF file. Tap on the ‘Edit PDF’ button to import the PDF file. Once you do this, you can edit the PDF document on the computer.


Step #3: Edit Text in your PDF

In case you wish to make alterations to your text on the PDF file, click on ‘Edit’ and the editable text will be outlined in boxes. Choose the target text, edit the font, rewrite the content, and alter the color of the font. You may even insert a text box to a PDF by choosing ‘Inset Text’.


Step #4: Edit and add images

Tap on ‘Image’ and import the target image file. Click on the exact page where you wish to insert the image. If you have to edit, choose the image and hit on the pencil icon that is shown in upper left corner of the box. As per you wish, you can replace the image with a new one or even rotate the image if you want to.

Step #5: Perform OCR to edit scanned PDFs

The OCR feature will let you edit scanned PDFs too. Select ‘OCR’ and the file will soon be converted to an editable PDF. This applicable will let you use OCR to convert scanned PDF to Word, Excel and other formats too.


Step #6: Reduce the size of PDF files

You can click on the ‘Compress’ tab and select ‘Add Files’ to upload the PDF. Next, choose the compression level. The more is the level of compression, the smaller will be the size of the file. Tap on ‘Start’ to perform the task and the tool also supports compressing PDFs in batches without compromising on its quality.

Step #7: Save and export the edited file

Once you’re done with editing your PDF file, you should ensure saving it and exporting it to your laptop. Don’t forget to export the document to your computer as you might lose the edited file if you don’t do this step.

SwifDoo PDF – Features

·         SwifDoo has a simple interface with nine tabs to choose from and each of them are labeled intuitively as per their function. Each of these tabs display their own toolbar whenever selected.

·         Editing PDFs in SwifDoo is as easy as working with Microsoft Document. You just have to click the Edit button in the Home tab in order to make it editable. You can later add or delete or even change the color and font of the text. It is also possible to customize blocks of text using the text-box tool.

·         Managing images is also very easy. Click on the image tool, choose the image file from the drive, and drag-and-drop it in one place.

·         SwifDoo has more than a dozen annotation tools that includes sticky notes, shapes, stamps, a highlighter, and pencil tool for scribbling marginalia.

·         It is possible to secure all kinds of sensitive documents with watermarks and encryption. Encryption uses two different kinds of passwords to safeguard your documents, a password that is needed to open any secured PDF file.

Conclusion

PDFs are usually read-only files and when you must edit a read-only PDF, you have to learn how to edit it. We hope we could help you with your editing requirements for your PDF files. We believe you could learn the various ways of editing PDF files on laptops that are compatible with various operating systems. In case you are value-conscious and you only use Windows, you should definitely leverage SwifDoo. This is a free-download software and once you use it, it’s totally worth your money. Feel free to post your comments in the section below so that we can stay informed on what you think about this useful PDF-editing tool.


Wednesday, March 16, 2022

How to Split a PDF into Multiple Files


When dealing with PDF documents, you may encounter that some of them are too large to be uploaded or sent. A simple way to solve this is to split these PDFs into multiple smaller files. Actually, there are a lot of functional tools that can help separate a PDF. Depending on your personal needs, you can choose desktop programs or online tools.


This article will expound how to make a PDF split up on Windows, Mac, and in Google Drive.

How to Split a PDF into Multiple Files on Windows

SwifDoo PDF is a desktop program available on Windows 10/8.1/7/XP. It has 30 more features including compressing, converting, merging, splitting PDFs. The software is developed with a straightforward interface so that users can quickly access the target tool. It also impresses users with the fast response and small memory footprint.


SwifDoo PDF makes it so easy to split a single PDF document into separate files. It is able to batch split multiple PDFs. Take a look at the step by step guide below to split PDF files on Windows PCs.


Method 1

Step 1: Launch SwifDoo PDF and import the PDF file that needs to be split;


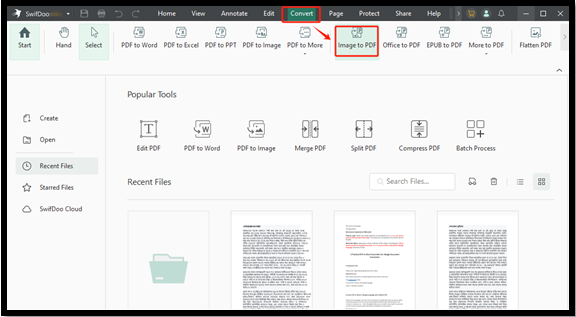
Step 2: Click Page on the top menu bar and select the Split tool;


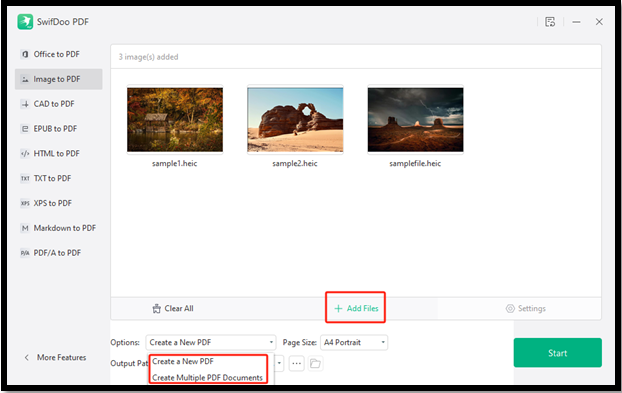
Step 3: In the pop-up SwifDoo Converter window, select the range of pages that you want to split under Page Range. Then choose which method you want to use to divide the PDF under Options: Split Evenly, Split Every X Pages, Custom Split;


Step 4: Select an output path for the exported files and hit Start to complete splitting.


Method 2

There is an easier way to access SwifDoo PDF splitter, with which you don’t have to open any file.


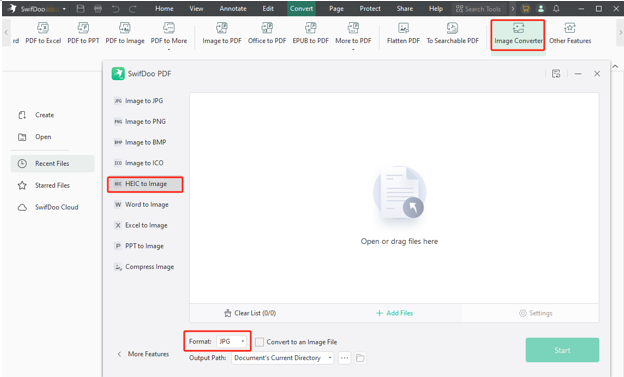
Step 1: Click PDF to Word in the Home tab after launching the software. Then you will directly get into the SwifDoo Converter;


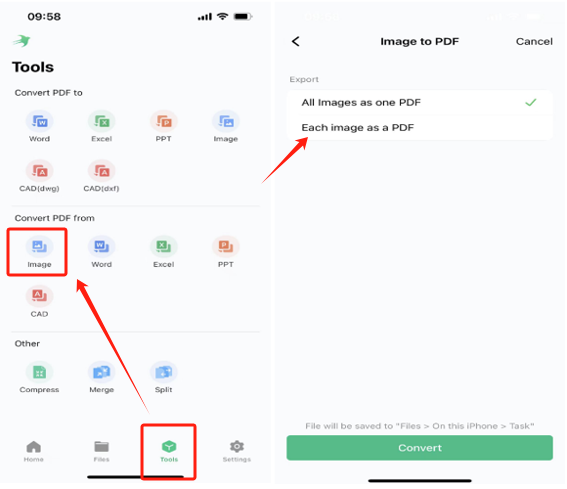
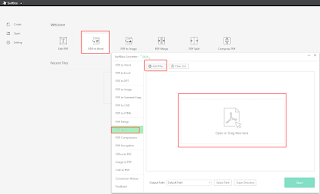
Step 2: Choose PDF Split in the left pane. Import your PDF document by clicking Add Files or dragging and dropping it into the window;


Step 3: Determine the page range, splitting method and output path. Press Start button.


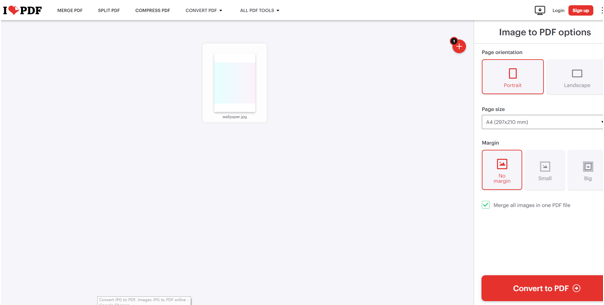
Using SwifDoo PDF, a 100Mb PDF file with hundreds of pages can be split into smaller documents in just a few seconds. That will vastly simplify your workflow and improve efficiency. When needed, you can share your PDF to Google Drive, Dropbox or email through SwifDoo PDF. Also, SwifDoo PDF is also useful if you want to know how to merge PDF.


While the industrial leader Adobe Acrobat surely can figure out the splitting issue, its high price may upset many users. If you are wondering how to split a PDF without Adobe Acrobat, SwifDoo PDF can be a great option.

How to Split a PDF into Multiple Files on Mac

Mac users are lucky to have a built-in PDF program, Preview. The program has some essential PDF features that you may need, including protecting, merging, printing PDF files. While Preview is not as strong as dedicated PDF software, it’s definitely helpful for splitting a PDF. Here is the description about how to split a PDF document in Preview.


Step 1: Launch Preview on your Mac and open a PDF file within it;


Step 2: Go to View, Thumbnails or View and choose Contact Sheet;


Step 3: Drag and drop exact pages from the thumbnails out of Preview to a new folder. By doing so, the moved pages will be grouped into an individual PDF file;


Step 4: Repeat the step 3 to split the current PDF into multiple smaller files.


Preview provides a free method to manually split PDF documents. If you do not have too many files, it’s absolutely a good solution. With Preview, you don’t need to purchase a third-party application. In case you have to fulfill more complicated and a larger number of PDF tasks in the future, there are a lot of alternatives developed for Mac systems in the market.        

How to Split a PDF into Multiple Files via Google Drive

PDF Merge and Split is free open-source software that works with Google Drive. It enables users to merge, split, rotate PDFs, and remove PDF pages. To download this application, you can go to Google Workspace Marketplace to search and install it. Then whenever you need to use the software, you can access it from Google Drive page. Check how to split PDF pages with PDF Merge and Split in browser. 


Step 1: Log into your Google Drive account. Click New on the top left corner, select More, and choose PDF Merge and Split in the drop-down list. You also can click Google apps icon on the top right corner of Google Drive page to find PDF Merge and Split;


Step 2: After opening the application, click Choose Files or Select files, folders from Drive to select PDF files from a local computer or from Google Drive. You can import several PDFs at the same time to the interface, but this application only allows to process one file each time;


Step 3: Click one file from the list and choose the task type Split PDF. Fill in the Starting page and End page input boxes with page numbers. Next, press Create PDF to start splitting;  


Step 4: Normally, it will prompt the status Completed at the end of Process Log. Then you can move to the bottom of the page and download the extracted PDF to your local device or save it to Google Drive. But if your PDF format is not supported by PDF Merge and Split, you should convert it to supported format first.


PDF Merge and Split only supports PDF1.4 and earlier PDF formats. For unsupported PDF, it has the ability to convert it to available formats. But the file size for conversion should not exceed 30Mb.

Choose the Most Suitable PDF Editor

Each of the 3 PDF programs can act as a PDF splitter. Both Preview and PDF Merge and Split are able to address some basic needs for PDF files. PDF Merge and Split, as an open source application, can be used on any device. Therefore, users of Mac, Linux or other operating systems may consider PDF Merge and Split as a handy PDF tool to perform simple tasks.


SwifDoo PDF is a one-stop solution to abundant PDF issues. It can work as a PDF converter, compressor, watermark and password remover, etc. Most features enable users to manage PDFs in batch. SwifDoo PDF adopts the ribbon bar that’s simple for users to learn. With respect to cost, it might be the most economical PDF editor among similar desktop applications.

Takeaway

For anyone who wants to try SwifDoo PDF, you can go to its official site or get it from Microsoft AppSource. Its installer is around 10Mb, and the downloading process will be fast and smooth. This Windows software provides up to 30-day free service without limitations of features or file quantity. With a single SwifDoo PDF account, you can use the application on multiple devices. That’s so convenient for those who need to work at office and home.


Thursday, April 16, 2015

Make Use of Formatted Data Recovery Software for Memory Card.

As a separate storage medium, memory card has been widely applied to mobile phones, digital cameras, portable computers and many other digital products. It brings much convenience, allowing us to carry with the important or confidential files/photos and use them at any moment. The size of memory card becomes increasing small and this contributes a lot to its portability. Meanwhile, the capacity is larger and larger as time goes by, making it appeals to more new users.

However, accidents also take place in memory card like in computer. Sometimes, it is the user itself that should be blamed for the accidents. For example, most users have the experience of formatting a memory card (or other devices) due to carelessness. In this regard, MiniTool Power Data Recovery is recommended as the best formatted data recovery software for memory card. The “Damaged Partition Recovery” is suitable for us all to recover data from formatted memory card or other digital products.

Use the Best Formatted Data Recovery Software for Memory Card
The memory card is just like partition: both of them are a separate unit to store and manage data. So the recovery of data from formatted memory card is the same to that from formatted partition.

Now, we’ll tell you how to recover data from formatted memory card by using that MiniTool formatted data recovery software for memory card.

Stage one: obtain MiniTool Power Data Recovery – one of the most popular data recovery freeware from its download center (which will be given at the end of article).


Stage two: launch the software to see main interface of it and choose “Damaged Partition Recovery” at this time.

Stage three: follow the instructions written in data recovery freeware interfaces to continue data recovery from memory card step by step. (Select the memory card from partition list -> press “Full Scan” -> select desired partition at the end of scan -> press “Show Files” button -> check files you need -> press “Save Files” button -> choose a safe location apart from original memory card -> wait for recovery.)

Note: if you don’t see memory card in the partition list, please try disconnecting the memory card and connecting it again to computer. If this also doesn’t work, please try pressing “Refresh List” button.

Obtain MiniTool Power Data Recovery – the formatted data recovery software for memory card that we recommend at this place.

Wednesday, April 15, 2015

There’s Way to Achieve Free Photo Recovery in Windows 8.

Photo is of great importance in current digital era for it is often a symbol of our good old days. Photos are actually part of our memory, whether it is sweet or sorrowful. Even if we were not in the good mood at the moment when the photo was taken, we now regard it as a valuable experience. However, sometimes, we may be stuck in the problem that valuable photos (especially those taken with deceased old friends or families) are missing. At that time, we must feel very regretful and depressed. Based on this fact, we plan to introduce a practical method for photo recovery in Windows 8. (Photo recovery in other Windows systems is similar.)

Get Free Photo Recovery in Windows 8 Service
As long as the lost photos in Windows 8 are important enough, we are willing to pay what we have to recover photos in Windows 8. And we bet all Windows 8 users would rather choose to get back lost photos for free than pay a lot of money on it as long as the method for free photo recovery in Windows 8 is reliable.

Here, we provide all Windows 8 users with a piece of powerful and safe free photo recovery software for Windows 8 to help them finish recovering lost photos in Windows 8 easily. The name of software is MiniTool Power Data Recovery.

Recovering Procedure
Step one: download and install recommended Power Data Recovery to a safe place.


Step two: choose “Digital Media Recovery” from the main interface of software and start recovery immediately after clicking on it.


Step three: select the location where lost photos belonged to and then click on “Full Scan” button to search for needed photos.


Step four: check needed photos in free photo recovery software for Windows 8 (users can preview the photo by using “File Preview” function), and press “Save Files” button to specify a saving place for them.

When all operations are completed by MiniTool Power Data Recovery, users can put an end to free photo recovery in Windows 8. By the way, if users can’t find needed photos by using “Digital Media Recovery”, they can try other modules.

Friday, April 10, 2015

SDHC card data recovery


SDHC is short for Secure Digital High Capacity. As users have higher and higher storage capacity requirement on mobile storage devices, SDHC gradually replace SD card and becomes the most widely used flash memory storage media. As the successor of SD card, SDHC has main features such as replacing FAT12/16 file system with FAT 32, supporting at most 32 GB storage capacity and at least Class 2 transferring speed. Therefore, SDHC can perfectly meet users’ requirements such as large capacity and high efficiency. Unfortunately, although SDHC is already very excellent, users still can’t avoid data security problems during the using process. For instance, if users accidentally carry out deletion or formatting, the important data on SDHC card may get lost.
It is very unlucky that important data on SDHC card gets lost, because users may have to face lots of unnecessary troubles and losses. To avoid these troubles and losses, acquiring a simple and practical SDHC data recovery solution and completely recovering lost important data from SDHC is undoubtedly the best choice. However, if users don’t know well about professional data recovery knowledge, you may as well use the powerful MiniTool Power Data Recovery to timely and effectively recover lost important data from SDHC card.

Use MiniTool Power Data Recovery to complete SDHC data recovery with ease
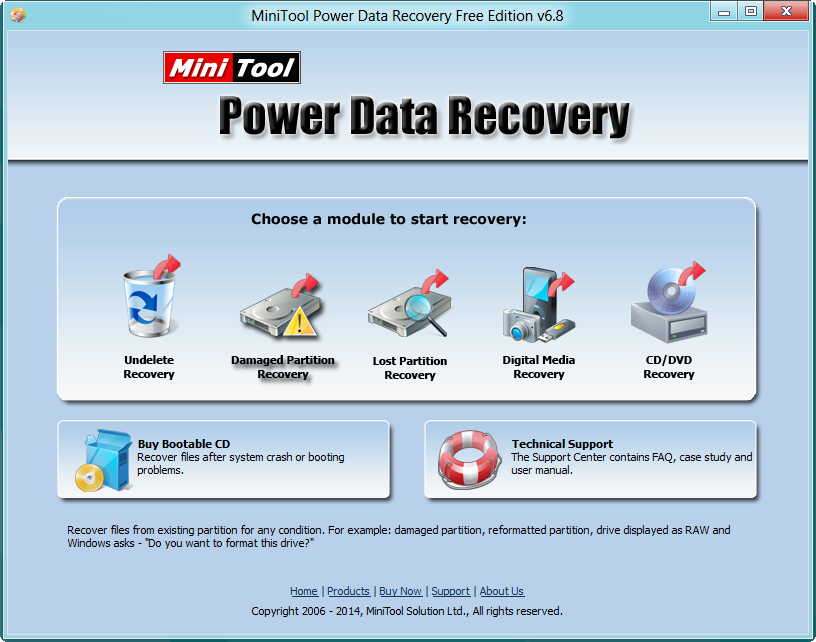
Since the professional data recovery software MiniTool Power Data Recovery is designed for common users, it has simple operations and complete functions, perfectly meeting users’ almost all commonly seen SDHC data recovery requirements. After users download this software via the official website http://www.powerdatarecovery.com/, install and start it to see the main interface, as follows:


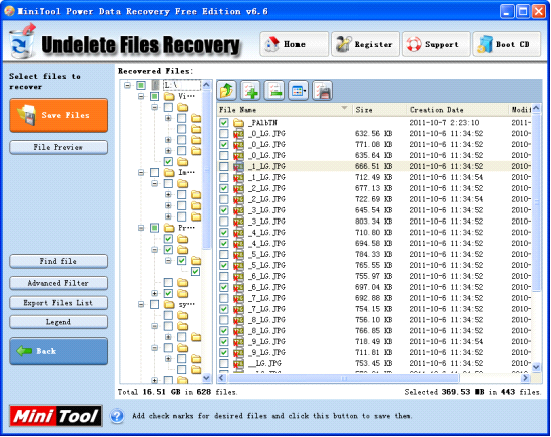
As shown on the main interface of MiniTool Power Data Recovery, there are multiple relatively independent data recovery functional modules. All users need do is to choose corresponding data recovery functional module according to real SDHC data loss situation. Then, carrying out operations to easily and complete recover lost important data from SDHC card. For instance, to recover deleted important data from SDHC card, users just need to click to enter “Undelete Recovery” to see this interface:


On the main interface of “Undelete Recovery” functional module, users just need to choose the SDHC card and then carry out operations by following the operating prompts in the area marked by red box. Then, users can easily complete SDHC data recovery with ease.

While experiencing the conveniences brought by SDHC card, users also need to value the security of important data. To avoid losses resulting from important data loss, users also need to install a piece of excellent data recovery software MiniTool Power Data Recovery to recover lost important SDHC card.

Thursday, April 9, 2015

Recover lost data caused by memory card error

That memory card error occurs is extremely bothersome when we are using memory card. Once we operate accidentally, a part of memory card data may be lost, or even worse, all data are lost. Facing this kind of data losses, what should users do? Do you want these data containing your efforts to vanish in this way? It is absolutely not. It is believed that all users will consider this situation beyond the pale. Therefore, when this situation caused by memory card error occurs, what users are supposed to do is try the best to recover lost data. However, since many users know little about data recovery, they may have difficulty in recovering lost data. For these users, it is suggested to use professional data recovery software to recover lost data. And the professional data recovery software – MiniTool Power Data Recovery released by MiniTool Solution Ltd., is recommended.

Use MiniTool Power Data Recovery to recover lost data caused by memory card error
Speaking of the professional data recovery software, MiniTool Power Data Recovery, maybe many users are not very familiar with it. In order to make these users understand this data recovery software more intuitively, we'll demonstrate how to recover lost data from memory card with MiniTool Power Data Recovery.
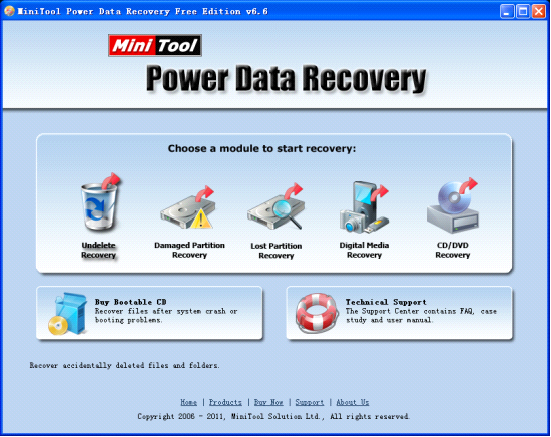
To use MiniTool Power Data Recovery to recover lost data caused by memory card error from memory card, we should firstly visit the official website http://www.powerdatarecovery.com to freely download and install this data recovery software to the computer. After that, run the data recovery software and we'll see the following interface.


The above picture is the main interface of MiniTool Power Data Recovery. We should click "Undelete Recovery" function module to recover lost data deleted because of memory card error. After clicking the function module, the following interface will be shown.


In this interface, we can see all partitions in the computer. Select the memory card partition where data losses have occurred and click "Recover" button to enter the recovery interface.


This is the data recovery interface. Check the data to be recovered and click "Save Files" button to save the recovered data to a safe location according to software prompts. Now, we have succeeded in recovering lost data from memory card.

Through the demonstration, you may have certain cognizance of this data recovery software. However, undeleting data is only one of its functions and it can help users recover lost data from damaged partition, formatted partition, lost partition and so on. In addition, for the sake of convenience, the developers also have designed a function module earmarked for digital media recovery, which helps users recover lost digital media files easily. If you are being troubled by data losses, just download MiniTool Power Data Recovery to recover lost data.

Wednesday, April 8, 2015

All memory card recovery software

No data lasts forever. The emergence of digital storage device prolongs the service time of data, but it still can’t prevent data loss. When the digital technology has not been developed so well, we often kept our data in notebooks. However, we are easily to lose them all after we drop the notebook somewhere and can’t find it. With advanced storage devices like USB flash drive and memory card, we can save important data more easily. Meanwhile, it becomes possible for us to carry large amounts of data and to read it anytime we want. Nevertheless, file loss problem still can’t be avoided. We all need to be prepared with professional memory card recovery software if our significant files are saved in a memory card.

Choose the Best Memory Card Recovery Software
Since software technology has been developing so fast, lots of memory card recovery software can be seen in daily life. However, please be very careful when you need to choose such software to recover deleted files from memory card. That is because not all of them are reliable; some of them may cause serious problems in computer.

In view of this, we strongly advise MiniTool Power Data Recovery for deleted files recovery. This is actually believed to be the best recovery software for memory card and we bet you’ll never regret choosing it.

How to Recover Deleted Files from Memory Card
Step one: launch MiniTool Power Data Recovery to see the main interface.


Step two: choose a functional module and click it to start deleted files recovery from memory card. “Undeleted Recovery” should be chosen now.

Step three: tap “Recover” button after you select the memory card from partition list.

Step four: check all the files you need from the right side and then click “Save Files” button from the left to specify a safe storage place for them.

If you can’t see needed files in step four, you can go back to the main window of MiniTool Power Data Recovery and choose other module to recover files under guidance.

Want to know further about the recommended memory card recovery software? Please go to see the home page.